해외 검사원 자격시험 자료 공유합니다
먼저 영어 공부를 선행하시고 시험 준비하기를 권장드립니다 본인은 일전에 드릴쉽승선해서 검사한 경험있는데 영어가들리지 않아 곤란한경험이 여러번있었습니다
일단 해외자격시험은 국내 자격보다 어렵지 않습니다 다만 영어로 시험이 진행된다는 점이 어려울뿐입니다
API 시험을 치고나서 느낌은?
시험코드는 반듯이 정독해보시고 시험 치세요 대분분의 문제가 해당코드에서 출제 됩니다 그리고 공부방법은 기출문제를 풀어보고 그문제가 어디에서 나오는지 알아야 한다는 것입니다 그것은 추가코드를 공부할때도 마찬가지 입니다 문제를 풀때 앞의 목차를 보면서 어디에서 나올것 같은지 한번씩 생각해 보시기를 추천 드립니다
아직 공유안한 자료들 많이 있습니다 혹시 필요하신분들 댓글 달아주세요 (510,570, 653, ASNT L3, CWI 등...기타 각종 코드 필요하신분들 )
국내 최저가 화상영어 추천(한달 5만원 20회 20분)
국내 최저가 화상영어 (한달 5만원 20회 20분)
국내 최저가 화상영어 추천(한달 5만원 20회 20분) 아직도 말 못하는 수업만 하고 계신가요? ‘영어는 공부’가 아니라 ‘언어’라는 점을 아셔야 합니다 때문에 당연히 원어민과 대화를 하면
qi-inform.tistory.com
Isometric views in more than one plane
Below are some examples of isometric drawings. The auxiliary lines in the shape of a cube, ensure better visualization of the pipeline routing.
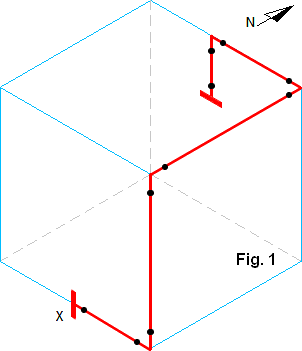
Figure 1 shows a pipeline which runs through three planes. The pipe line begins and ends with a flange.
Routing starting point X
- pipe runs to the east
- pipe runs up
- pipe runs to the north
- pipe runs to the west
- pipe runs down
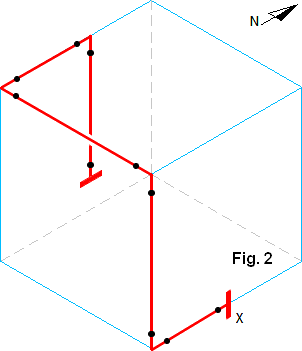
Figure 2 is almost identical to the drawing above. A different perspective is shown, and the pipe that comes from above is longer.
Because this pipe in isometric view, runs behind the other pipe, this must be indicated by a break in the line.
Routing starting point X
- pipe runs to the south
- pipe runs up
- pipe runs to the west
- pipe runs to the north
- pipe runs down
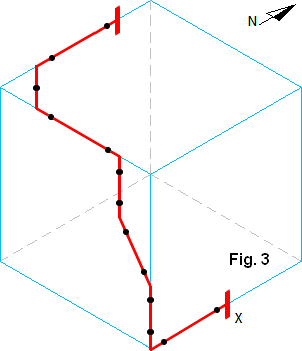
Figure 3 shows a pipe that runs through three planes and in two planes it make a bow.
Routing starting point X
- pipe runs to the south
- pipe runs up
- pipe runs up and to the west
- pipe runs up
- pipe runs to the west
- pipe runs to the north-west
- pipe runs to the north
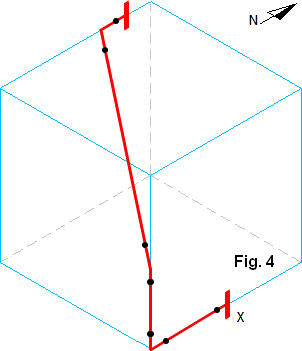
Figure 4 shows a pipe that runs through three planes, from one plane to a opposite plane.
Routing starting point X
- pipe runs to the south
- pipe runs up
- pipe runs up and to the north-west
- pipe runs to the north
Hatches on a Isometric Drawing
Hatches on isometric drawings being applied, to indicate that a pipe runs at a certain angle and in which direction the pipe runs.
Sometimes, small changes in the hatch, the routing of a pipe is no longer the east, but for example suddenly to the north.
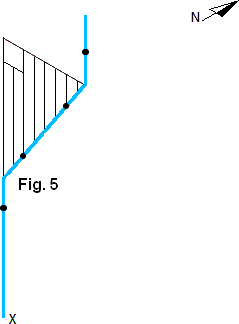
Figure 5 shows a pipe, where the hatch indicates that the middle leg runs to the east.
Routing starting point X
- pipe runs up
- pipe runs up and to the east
- pipe runs up
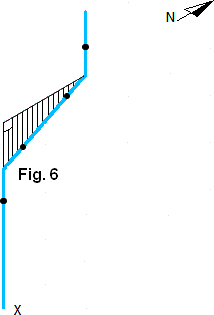
Figure 6 shows a pipe, where the hatch indicates that the middle leg runs to the north.
Routing starting point X
- pipe runs up
- pipe runs up and to the north
- pipe runs up
The two drawings above show, that changing from only the hatch, a pipeline receives a different direction. Hatches are particularly important in isometric views.

Figure 7 shows a pipe, where the hatches indicates that the middle leg runs up and to the north-west.
Routing starting point X
- pipe runs up
- pipe runs up and to the north-west
- pipe runs to the north
'inspection > 검사자료' 카테고리의 다른 글
| P&ID로 알수있는 정보 (1) | 2022.04.26 |
|---|---|
| 장비 커플링이란? (0) | 2022.04.26 |
| 일반적 부식 (0) | 2021.11.26 |
| 침식부식 (Erosion Corrosion) 특성 (0) | 2021.11.25 |
| 부식의 관점에서 금속 재료 (0) | 2021.10.22 |


댓글